Small Walk-In Closet Layout: Protect the Aisle Before You Add More Storage
A small walk-in closet can have plenty of wall surface and still be difficult to use. The problem usually appears after the storage is loaded: hanging clothes project into the room, a drawer opens into the path, the entry door claims part of a wall, or two storage runs compete for the same corner.
The useful question is not, “How much storage can I fit around the walls?”
It is, “What layout still works after the storage, clothes, moving parts and normal path through the closet are all included?”
Start with the room you actually have. Measure the opening and fixed obstructions. Then measure the storage by the space it occupies when loaded and operated. Protect the path that remains. Only after that should you decide whether the room can support one storage wall, an L-shape, two opposing runs or a third storage wall.
On this page
- The quick answer: protect the aisle before you fill the walls
- Measure the actual room envelope and opening
- Map the entry door and fixed obstructions
- Measure storage by its loaded depth, not just its empty body
- Find the aisle that remains after the storage is loaded
- Test a one-wall layout first
- Test an L-shaped layout by the corner, not by total wall length
- Test a two-wall layout by what remains between the loaded sides
- Use a three-wall layout only if the end wall still has a real job
- Test drawers and doors in their open positions
- Account for corner loss before you count every inch
- Use this small walk-in closet layout worksheet
- Worked example: two storage walls fit on paper but the drawer blocks normal use
- Common small walk-in closet layout mistakes
- Before you buy or build a closet system
- A small walk-in works when the path survives the storage
The quick answer: protect the aisle before you fill the walls
Treat every wall as a candidate, not an entitlement.
A workable sequence is:
MEASURE ROOM → MAP OPENING / DOOR / OBSTRUCTIONS → MEASURE STORAGE BODY → ADD LOADED PROJECTION → FIND REMAINING AISLE → CHECK CORNERS → ADD DRAWER / DOOR / PULL-OUT MOTION → TEST A LAYOUT → TEST MOVEMENT / RETRIEVAL → KEEP / REDUCE / CHANGE LAYOUT / BUY VERIFIED-FIT / SKIP
This order matters because a small walk-in can pass an empty-room test and fail a use test.
A shelf can fit against the wall and still leave clothes projecting farther into the room than expected. A wardrobe frame can fit on each side while the loaded space between them feels too restricted for the household using it. A drawer can fit perfectly when closed and block the only standing path when opened.
More wall coverage is not the goal. A layout earns the room only when the storage and the path work together.
Measure the actual room envelope and opening
Measure the closet itself before you choose a layout.
Record the interior width and depth at the floor. If the room changes shape, measure the narrower portions too. Note the usable height only where height will affect the storage you are considering.
Then record the opening.
The opening matters because a storage run that fits inside the room may still be awkward to install, reach or use if the doorway is narrow, off-center or partly occupied by trim.
Do not turn one “minimum walk-in closet size” from a search result into proof that your room can handle a particular layout. Nominal room size tells you the outside limit of the problem. It does not tell you what remains after storage is loaded.
For this article, the room envelope is simply the real interior geometry you have to work with.
Map the entry door and fixed obstructions
Now draw the parts of the room that cannot be negotiated away.
That may include the entry door and its swing, trim, a window, a vent, an access panel, an electrical switch, a sloped section or another fixed feature that affects where a storage body can sit or how it can open.
If the door swings inward, mark the full swing before you count the wall behind it as storage space. If the opening sits close to a corner, note how much uninterrupted wall actually remains.
This is a common planning error: a wall looks available in a room sketch, so it is counted at full length. But the first part of that wall may be unusable because the entry door needs it, a drawer would collide with trim, or the user would have to stand in the doorway to reach the storage.
Measure the usable wall segment, not the theoretical wall.
Measure storage by its loaded depth, not just its empty body
The next measurement is the storage itself.
Start with the physical body: shelf, wardrobe frame, cabinet, drawer carcass or freestanding unit. Then add the things that will actually live on or in it.
Hanging clothes are the obvious example. A storage frame may have one stated body depth, but jackets, dresses, hangers or bins can project beyond the front of that body. The room experiences the loaded storage depth, not the empty catalog rectangle.
Current IKEA PAX frames illustrate why the exact product matters. IKEA’s current PAX frame size options include substantially different frame depths, including 13 3/4-inch and 22 7/8-inch options. That does not make either depth “right” for a small walk-in closet. It shows why “a wardrobe system” is not one fixed geometry. If a named system survives into your plan, verify the dimensions for that exact configuration.
For unbranded shelves or existing built-ins, the principle is the same: measure what the storage occupies when it is doing its real job.
If clothing projects beyond a shelf, measure to the front of the clothing.
If a bin handle sticks out, include it.
If shoes sit beyond the shelf edge, include the actual use position.
Your layout should be based on the loaded envelope, not the tidiest possible empty-body measurement.
Find the aisle that remains after the storage is loaded
Now use the room width to find what is left.
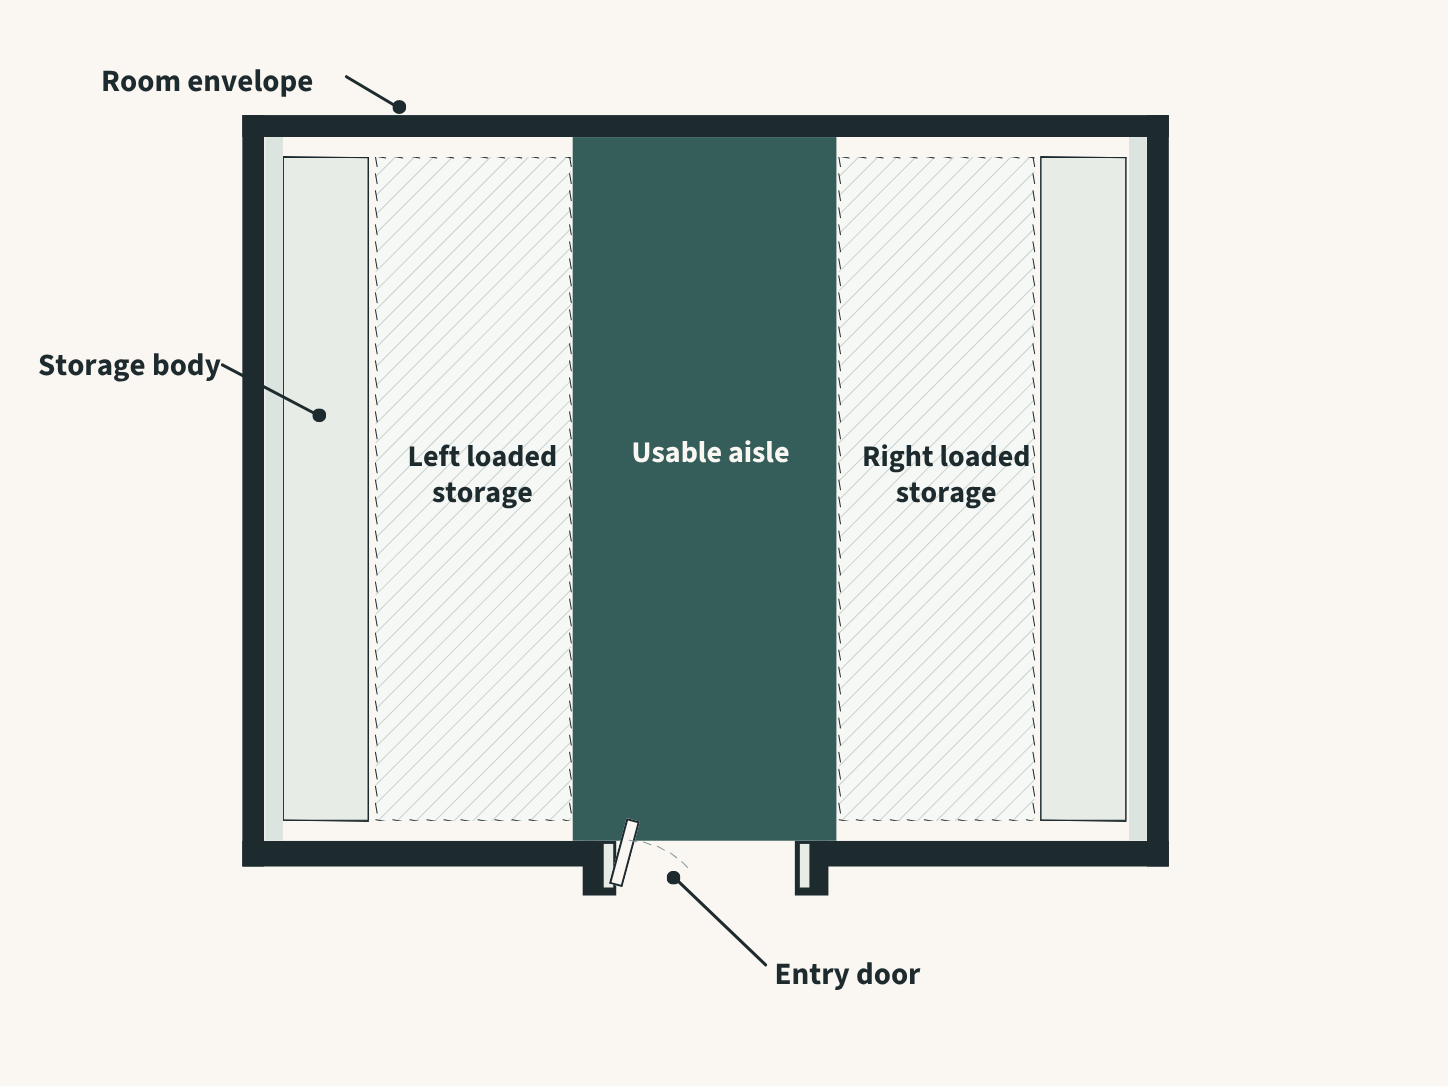
For two opposing storage runs, the basic household-specific calculation is:
ROOM WIDTH
− LEFT LOADED STORAGE DEPTH
− RIGHT LOADED STORAGE DEPTH
= REMAINING PATH
That result is not a building-code minimum or an accessibility standard. It is simply the real space that remains in this room after the proposed storage is loaded.
Then test that remaining path for the household that uses the closet.
Can the person stand where clothing needs to be removed and returned?
Can she turn while holding a laundry basket or an armful of clothes if that is part of normal use?
Can she step aside while a drawer is open?
Can the second person using the closet pass when that matters?
The exact answers are household-specific. The important correction is conceptual: room width and usable aisle width are not the same measurement.
If your layout depends on pretending the loaded storage is thinner than it really is, the layout has already failed its first test.
Test a one-wall layout first
Before you try to use every wall, test the simplest layout.
Put the primary storage job on one wall. Use the opposite side as clear standing and movement space, or reserve it for a shallower secondary job that does not compromise the path.
A one-wall layout can look less “maximized” in a plan and work better in daily life. It can make hanging clothes easier to scan, give drawers room to open and leave enough clear floor for dressing and retrieval.
That does not mean every small walk-in should be one-sided.
It means one wall gives you a baseline. If the room works with one storage run, you can add another only when the measured geometry proves that the extra storage does not break the path or operation.
Starting with the simplest layout also makes tradeoffs obvious. You can see exactly what you gain when you add a second wall—and exactly what usable space you give up.
Test an L-shaped layout by the corner, not by total wall length
An L-shaped layout looks efficient because it uses two adjoining walls without placing storage directly opposite itself.
The weak point is the corner.
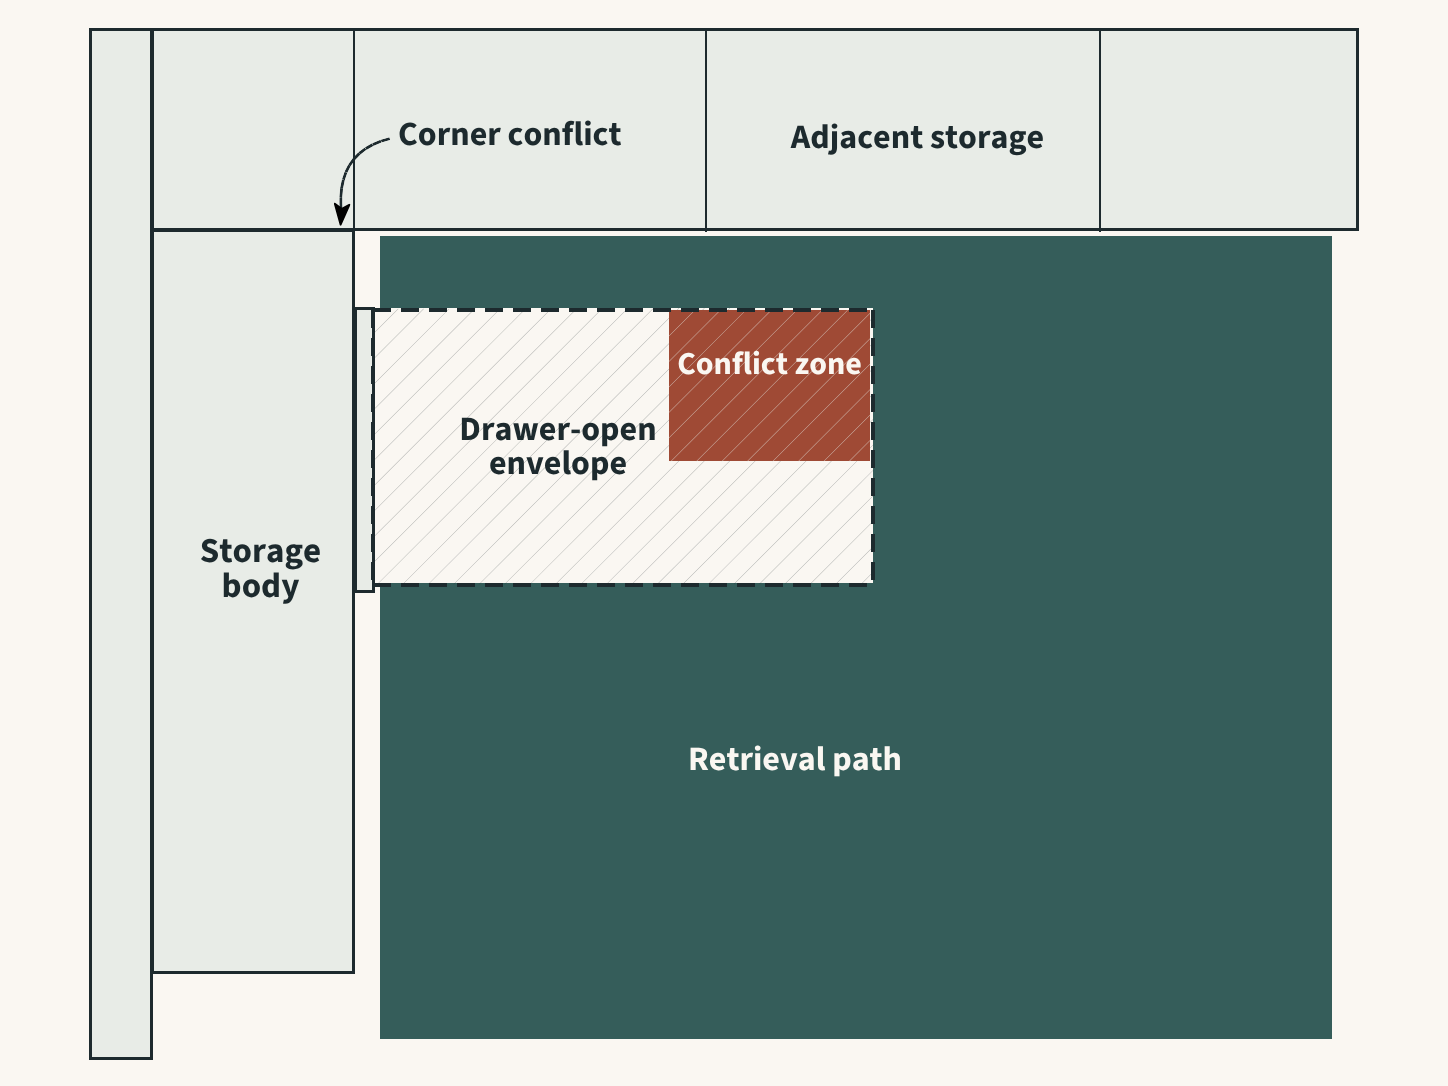
Two storage bodies can fit individually and still compete where they meet. Hanging clothes from one run may project into the face of the other. A drawer near the corner may lose opening room. Shelves may become visually deep and difficult to reach because one run blocks access to the other.
Do not add the two wall lengths together and call that your available storage.
Draw both loaded storage envelopes into the corner.
Then ask which side owns the corner job.
Sometimes one run should stop short so the other can remain fully accessible. Sometimes the corner is better used for a shallower shelf, hooks or a leave-clear zone. Sometimes the second wall adds enough useful capacity to justify the compromise.
The decision comes from the actual overlap, not from a generic L-shaped template.
Test a two-wall layout by what remains between the loaded sides
A two-wall or galley layout places storage on opposing sides.
This is where the distinction between body depth and loaded depth becomes critical.
Measure the loaded left side.
Measure the loaded right side.
Subtract both from the room width.
Then test the remaining path.
A two-wall layout may work beautifully when one side is shallow and the other handles hanging. The same room may become frustrating when both sides carry deep storage, hanging clothes or moving drawers.
Do not assume symmetry is an advantage.
Matching systems on both walls can be visually clean while consuming more path than the room can comfortably give up. Different jobs can justify different depths.
The best two-wall arrangement is not necessarily the one with the most storage. It is the one where both sides can perform their jobs without turning the middle of the closet into leftover space.
Use a three-wall layout only if the end wall still has a real job
A small walk-in often tempts the planner to use the back wall too.
The question is whether that wall remains useful after the two side runs are loaded.
Stand at the entrance and imagine the side storage in its real loaded state. Can you still see the end-wall storage? Can you stand where you need to retrieve from it? Can a drawer or door there open? Do the side runs make the back corner difficult to use?
A shallow back-wall shelf can sometimes perform a useful job where a deeper body would crowd the room. In another closet, the end wall may be better left mostly clear because it protects turning space or makes the side runs easier to use.
Again, there is no universal depth to copy.
The end wall earns storage only if it can still be reached, seen and operated after the adjoining walls are doing their jobs.
Test drawers and doors in their open positions
Closed storage is not the whole layout.
Any moving component creates an operating envelope: temporary space used when the drawer, door, pull-out or basket opens.
Current IKEA KOMPLEMENT drawers provide a simple manufacturer example. The current KOMPLEMENT drawer for the deeper PAX frame publishes a maximum pull-out depth of 16 1/2 inches. The current KOMPLEMENT drawer for the shallower PAX frame publishes a maximum pull-out depth of 8 1/4 inches. Those numbers are not universal clearances. They show that operating travel is specific to the product and configuration.
For your closet, test the exact moving component you plan to use.
Mark the closed body.
Then mark the open position.
Does the open drawer consume most of the remaining aisle?
Does a hinged cabinet door collide with hanging clothes across the room?
Can you stand in front of the open drawer and actually use it?
Does a pull-out block the entry door?
This is why a storage system can fit against the wall and still fail the room.
Resting fit is not operating fit.
Account for corner loss before you count every inch
Corners make small walk-ins look more generous on paper than they behave in use.
If two runs meet, some of the space near the intersection may be claimed twice.
One wall may need room for hanging clothes to project.
The other may need room for a drawer front to open.
A shelf may physically continue into the corner but become difficult to see or reach.
Instead of forcing every inch into a storage calculation, mark the conflict.
Ask what happens when both adjoining zones are loaded and one of them is being used.
If the answer is “one side has to be emptied, moved or closed before the other can work,” you have found corner loss.
The fix may be to stop one run short, use a shallower corner job, shift a moving component away from the intersection or leave part of the corner deliberately clear.
The corner does not have to be full to be useful.
Use this small walk-in closet layout worksheet
Use one row for each layout candidate you are considering.
| Room / location | Room width | Room depth | Opening / door position | Door swing / movement | Fixed obstruction | Left body depth | Left loaded projection | Right body depth | Right loaded projection | End-wall body depth | Remaining aisle | Corner conflict | Moving component | Operating travel | Candidate layout | Movement / retrieval test | Decision |
|---|---|---|---|---|---|---|---|---|---|---|---|---|---|---|---|---|---|
| Example | ONE WALL / L / TWO WALL / THREE WALL | KEEP AS-IS / REDUCE DEPTH / REMOVE ONE STORAGE RUN / CHANGE LAYOUT / BUY VERIFIED-FIT / SKIP | |||||||||||||||
| Candidate 1 | |||||||||||||||||
| Candidate 2 |
Do not start in the “candidate layout” column.
Start with the room and the storage jobs you already know you need. Measure the bodies, then the loaded projection, then what remains.
Only after that should you test a layout.
The worksheet separates three questions that are easy to blur together:
Does the storage body fit the wall?
Does the loaded storage still leave a workable path for this household?
Can every moving part perform its job without creating a conflict the household cannot accept?
A “yes” to the first question is not a pass on the other two.
Worked example: two storage walls fit on paper but the drawer blocks normal use
EXAMPLE — HYPOTHETICAL / NOT A TESTED HOUSEHOLD / NOT A UNIVERSAL STANDARD.
Imagine a small walk-in closet that is 66 inches wide.
On the left, the household plans loaded hanging/storage that projects 22 inches into the room.
On the right, a closed storage body projects 14 inches.
Before anything opens, the remaining path is:
66 − 22 − 14 = 30 inches.
That number is not being presented as a standard or a pass/fail threshold. It is simply the remaining space in this hypothetical room.
Now add one moving part.
Suppose the right-side drawer extends another 10 inches into the path when open. During drawer use, the remaining path at that location becomes 20 inches.
The layout still “fits” in the sense that both storage bodies fit against their walls.
But the household now has a different question: can the person who uses the closet stand, reach the drawer contents and move normally while the drawer is open?
If the answer is no for this household, the fix is not to argue that the room technically contains the furniture.
The fix is to change the layout.
Possible responses include using a shallower moving component, moving the drawer to another wall, removing one storage run, changing the layout or skipping that product.
The lesson is not that 30 inches is good or that 20 inches is bad.
The lesson is that the open position belongs in the layout decision.
Common small walk-in closet layout mistakes
Filling every wall because it is technically available
Wall area is not the same as usable storage area. Add loaded depth, the entry path and operation before you count a wall as productive.
Measuring empty shelves instead of loaded clothing
The room interacts with the front of the clothes, bins and shoes—not just the back panel of the system.
Counting wall length without the entry door
An inward-swinging door or an opening near a corner can remove the most convenient part of a wall from the layout.
Ignoring drawers until after installation
A drawer that fits closed may create the worst conflict in the room when it opens. Test moving components during planning.
Treating the corner as full storage on both walls
Two wall runs can compete for the same corner volume. Decide which run owns the corner or intentionally reduce one.
Choosing a layout from an inspiration photo without matching geometry
A beautiful walk-in photo does not prove the room has the same width, door position, storage depth, clothing projection or moving components as yours.
Using “minimum dimensions” as proof that a layout will work
A generic minimum can describe a rule of thumb or one source’s design convention. It does not substitute for the actual storage and operating geometry in your room.
Buying the system before choosing the layout
Product dimensions should solve a measured layout problem. They should not become the problem the room has to absorb.
Letting organization decisions replace physical fit checks
Category zones, shoe sections and accessory drawers matter later. First prove that the room can physically support the layout. Broader closet organization is a different decision from small-room geometry.
Before you buy or build a closet system
Finish the room and layout worksheet before shopping.
For any named system that survives into the buying stage, verify the exact current model rather than the product family in general.
Check the body width, depth and height.
Check what the actual clothes or containers add in front.
Check the door, drawer or pull-out travel.
Check the entry door and any corner interaction.
Check the installation and anchoring instructions for that exact product.
Then test the layout one more time with the real numbers.
If one side only works when clothing is compressed unrealistically flat, the layout has not passed.
If a drawer only works when no one can stand in front of it, the layout has not passed.
If the corner requires moving one category every time another is used, the corner has not passed.
The point of measurement is not to prove that more storage fits.
It is to discover which storage jobs the room can support without making normal use harder.
A small walk-in works when the path survives the storage
A small walk-in closet does not need to use every wall to work well.
Measure the room you actually have. Map the opening and door. Measure storage in its loaded state. Protect the path that remains. Then add corners and moving parts to the test.
Start with the simplest layout that works.
Add another storage wall only when the measured room can support it without sacrificing the movement and retrieval the closet exists to provide.
The best layout is not the one that fills the most perimeter.
It is the one where storage, clothes, drawers, doors and the person using the room can all do their jobs at the same time.
Sources used for this guide