Bedroom Alcove Storage: What Actually Fits and How to Measure It
An awkward bedroom alcove can look like free storage. That is how a perfectly reasonable idea turns into a piece of furniture that technically fits between two walls but still makes the room harder to use.
The problem is usually not the idea itself. A dresser, narrow wardrobe, desk, bench or shelving unit may all be sensible options. The mistake is treating the alcove like an empty rectangle instead of part of a working bedroom.
Before you buy anything, decide what job the recess needs to do. Then measure the real usable space, including the parts that steal room from a furniture footprint: trim, sloped ceilings, windows, outlets, pipes, radiators or other features that are actually present. Finally, check what has to move in front of the furniture—doors, drawers, curtains, your own walking route—and whether the item can reach and be assembled in the room.
If the whole bedroom feels awkward rather than just the alcove, start with the broader function-first reset in How to Refresh a Bedroom Without Replacing Furniture: Fix Function First:
The right alcove solution is not the one that fills the most space. It is the one that fits the real room and still works every day.
Start by deciding what the alcove needs to do
Do not begin with “What can I buy for this nook?” Begin with “What problem would this space solve?”
A bedroom alcove might have a useful job as:
- clothing storage;
- a compact desk or vanity;
- bedside storage;
- books or display;
- occasional or low-frequency storage;
- a chair or bench if seating is actually useful;
- or nothing at all.
Leaving an awkward recess open is not a failure. If adding furniture would pinch the walking route, interfere with a door or window, or create another surface that collects clutter, open space may be doing the better job.
This first decision also keeps the purchase proportional. A reader who needs a place for folded clothes has a different problem from someone who needs a small work surface. The alcove shape does not decide the furniture by itself.
Measure the usable envelope, not one optimistic number
Once the job is clear, sketch the alcove on paper. It does not need to be a formal floor plan. You are creating a record of the real space so you can compare it with an actual product later.
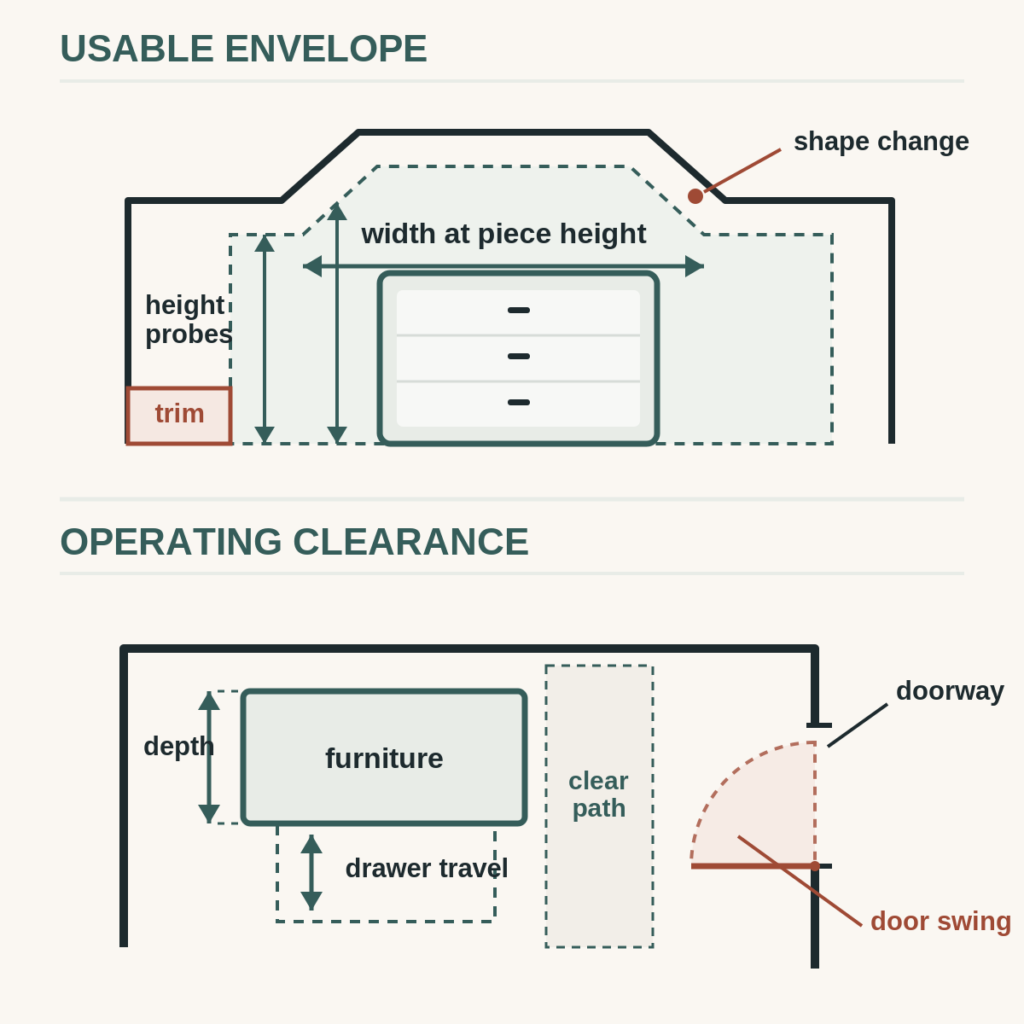
At minimum, record:
- width;
- height;
- depth.
IKEA’s current U.S. wardrobe guidance uses the same basic starting point: measure the available height, width and depth, and account for structural features such as recesses or sloping ceilings plus obstructions such as radiators and pipes.
An alcove does not always stay the same size from front to back or floor to ceiling. If the walls visibly taper, the ceiling slopes, the floor changes, or the recess narrows at one point, take additional measurements where the geometry changes and keep those readings separately.
Do not average away a meaningful difference just because one number would be easier to shop with. A rigid freestanding piece has to pass the limiting parts of the opening that actually affect it. The exact product or installer instructions still control final tolerances.
If the alcove changes shape, your notes might include:
- width near the lower part of the recess, if different;
- width around the height where the furniture body will sit;
- width higher up if a tall unit is being considered;
- floor-to-ceiling or floor-to-the-relevant-top-point height;
- depth on each side if the alcove is visibly uneven;
- any projection that changes the usable footprint.
You do not need extra measurements where the shape is clearly uniform. The point is to record the room you actually have rather than assume it is perfectly square.
Mark the obstructions before you shop
The wall-to-wall dimension is not always the same as the usable furniture footprint.
Look at what projects into or crosses the space. Depending on the room, that may include:
- baseboards or other trim;
- a sloped ceiling;
- a window sill;
- curtain rods, blinds or shutters;
- outlets or switches;
- pipes;
- a radiator;
- a supply register, return vent or other HVAC feature;
- a closet or room door near the opening.
Not every feature automatically rules out furniture. It changes what you need to compare.
For example, a piece with legs may interact with baseboards differently from a solid plinth. A drawer unit can physically sit in a recess while covering an outlet you still need. A tall item may clear the center of a sloped ceiling but collide at one corner. Furniture beneath or beside a window may leave enough wall space while making curtains, blinds or normal window access awkward.
This is why the sketch matters. Put the obstructions on it instead of trying to remember them while looking at product pages.
IKEA’s U.S. planning tools also treat room features such as windows, outlets and pipes as part of detailed room planning rather than as afterthoughts.
The goal here is practical: keep the room feature usable, then follow any property, product or local requirement that applies to it. This article does not replace those instructions.
Test doors, drawers and the path in front
A furniture footprint is only half the fit question.
The second half is the operating envelope: the space the item and the room need when someone actually uses them.
Check:
- furniture doors;
- drawers;
- the bedroom door;
- the closet door;
- curtains or blinds;
- nearby window access;
- the route around the bed;
- the route you use to enter, dress, open storage or move through the room.
IKEA’s wardrobe guidance specifically tells shoppers to allow enough space for hinged wardrobe doors to open fully. That is a useful general lesson even though the exact clearance belongs to the exact product.
A dresser can fit neatly into an alcove and still be a bad choice if its drawers hit the bed. A desk can fit wall-to-wall but leave no comfortable route to the chair. A tall cabinet can clear the walls but force the bedroom door into an awkward stop.
If you are unsure how a footprint will feel, use a non-damaging mock-up. A flattened cardboard box, paper pieces laid on the floor or another finish-safe temporary outline can show how far the furniture body would project. Then walk the route you would actually use and open the nearby doors or drawers.
Do not use a marking method that could damage the specific floor or finish. The goal is to test space, not create a repair project.
Check whether the furniture can reach and be assembled in the room
A piece can fit the final alcove and still fail before it gets there.
For larger furniture, check the route from the home entrance to the bedroom. Pay attention to the parts that could limit the move:
- door openings;
- narrow hallways;
- stair turns;
- landings;
- low ceilings;
- tight corners into the bedroom.
Then look at the seller or manufacturer information for packaged dimensions, assembled dimensions and assembly method when those details are available.
Some furniture also needs more space during assembly or uprighting than it occupies after installation. IKEA’s current PAX guidance, for example, specifies additional clearances that vary by frame and door configuration. Those numbers apply to that system, not to unrelated wardrobes, but they illustrate why finished-product dimensions are not always the whole installation requirement.
Use the exact manufacturer instructions for the actual piece you are considering. Do not transfer another product’s assembly clearance because the finished sizes look similar.
What tends to work in different alcove shapes
Once the measurements and operating limits are clear, furniture ideas become easier to judge.
A shallow recess
A shallow alcove may work better for a lower-profile job than for deep clothing storage. Depending on the exact depth and the room’s needs, that could mean books, display, a narrow freestanding cabinet, a compact work surface or simply an open visual break.
Do not force a wardrobe into a depth that makes it project awkwardly into the room just because the width looks convenient.
A narrow, tall recess
A narrow alcove can make vertical storage tempting. A slim cabinet, narrow wardrobe or open storage system may be worth comparing if it actually serves the room.
Tall furniture adds another question: stability. The fact that a piece looks wedged between two walls does not replace the product’s anchoring requirements.
A low, wide recess
A lower, wider space may suit a dresser or chest, bench, desk or vanity if the item’s depth and moving parts still work.
If the alcove is near a window, check the window, curtain or blind operation rather than treating the wall area as uninterrupted furniture space.
A tapered or sloped alcove
Irregular geometry deserves more fit checking because a rigid rectangular piece cannot adapt to a narrowing wall or sloping ceiling.
That does not mean the answer must be custom built-ins. A smaller freestanding piece, open or adjustable storage, a different job for the alcove, or no furniture may be the simpler solution.
An alcove with no useful repeated job
Leave it open.
A home does not become better organized by filling every available recess. Empty floor or wall space can preserve movement, light and flexibility.
Freestanding, removable or built-in: choose the least complicated solution that solves the job
There are three broad routes once the alcove’s job and usable envelope are known.
Freestanding furniture
Freestanding furniture gives you a published product footprint to compare with the measured space, but it still needs the full fit check: body, doors or drawers, route, assembly and anchoring where applicable.
Removable or wall-free storage
If permanent changes are not a good fit for the home, look at wall-free or removable methods only after you know the storage job and load.
Our renter-friendly wall storage guide explains how to think about permission, surface, load and fall consequence before choosing among wall-free, removable and other low-permanence options:
Do not assume every no-drill method fits every surface or load.
Built-in or custom storage
Custom work can be designed around irregular geometry, but it is a more committed route and should solve a problem that simpler options do not.
Before moving toward a built-in, confirm that the alcove genuinely needs that job, the budget makes sense, the property allows the work and the design preserves the room’s normal operation.
A difficult shape is not, by itself, a reason to build permanent storage.
Safety check for dressers, chests and tall storage
If the alcove solution is a dresser, chest or other top-heavy storage piece, treat stability as a separate requirement from fit.
The U.S. Consumer Product Safety Commission’s Anchor It! guidance advises consumers to secure top-heavy furniture and follow manufacturer instructions for proper anchoring.
A snug-looking alcove does not prove a piece cannot tip. Do not remove or skip anti-tip hardware because the furniture happens to sit between walls. Use the instructions for the actual furniture and the actual wall condition.
Quick decision table: does this piece really fit?
| Check | What to record | Why it matters | Reject / recheck if |
| Job | What the alcove needs to do | Prevents buying storage for the wrong problem | The product has no clear repeated job |
| Width / height / depth | Actual alcove dimensions, plus extra readings where geometry changes | Confirms the rigid body can occupy the space | Any relevant point conflicts with the product or installer requirement |
| Obstructions | Trim, slope, window, outlet, pipe, radiator/HVAC or nearby opening if present | Wall-to-wall space may not equal usable footprint | The furniture blocks or conflicts with a feature you need |
| Doors / drawers / openings | Furniture movement plus bedroom/closet/window operation | A piece has to work after it fits | Anything cannot open or be reached normally |
| Walking / access zone | Route around bed and in front of the alcove | Protects daily room function | The new footprint creates a daily squeeze or blocked route |
| Route / assembly | Doorways, halls, stairs, packaged dimensions and assembly method | The product must reach and be assembled in the room | It cannot reach the room or lacks required assembly clearance |
| Product instructions / stability | Exact installation, anchoring and clearance requirements | Product-specific rules control final fit and safety | The plan depends on ignoring the manufacturer instructions |
An eight-step fit check before you buy
1. Name the alcove’s job.
Do not shop until you can say what repeated problem the space is supposed to solve.
2. Sketch the recess.
Include the walls, floor, ceiling and nearby openings that affect the space.
3. Record height, width and depth.
Use the actual finished surfaces you are placing furniture against.
4. Add measurements where the geometry changes.
If the alcove visibly narrows, slopes or tapers, record those differences rather than relying on one best-case number.
5. Mark obstructions and adjacent features.
Add only what exists: trim, window, outlet, pipe, radiator/HVAC feature, curtain hardware, door swing or similar constraint.
6. Test the operating envelope.
Check furniture doors and drawers, nearby room openings, window access and the route you use every day.
7. Check route, assembly and the exact product instructions.
Make sure the item can reach the room and that the installation method works in the available space. Product-specific clearance and anchoring instructions control.
8. Buy only if fit and function both pass.
A piece that barely occupies the recess but makes the bedroom harder to use has not passed the test.
The alcove does not have to disappear
An awkward recess does not need a dramatic makeover. It needs a clear job and an honest fit check.
Measure the real envelope. Mark what changes it. Test the moving parts and the walking route. Check how the furniture gets into the room and what the manufacturer requires. Then choose the simplest option that solves the actual problem.
Sometimes that will be a dresser, desk, shelving unit or wardrobe. Sometimes it will be removable storage. Sometimes the best answer is to leave the alcove alone.
The useful result is not a perfectly filled nook. It is a bedroom that still works after the furniture arrives.