Above-Toilet Storage: Measure What Actually Fits Before You Buy a Cabinet or Shelf
Above-toilet storage looks simple in product photos: put a cabinet or shelf over the toilet and use the empty vertical space.
The fit problem is more complicated.
A unit can be narrow enough for the wall and still fail because the opening between its legs or supports does not clear the actual toilet and tank. It can fit around the toilet but block tank or service access. It can technically stand there while projecting too far into a tight bathroom. A wall-mounted option can avoid floor legs and still fail if the wall, mounting instructions or daily reach do not work in that room.
Treat “over-the-toilet” as a use case, not a fit guarantee.
Before you buy, measure the toilet and tank, the wall around them and the exact product. Then check the product opening, body depth, access, cleaning and installation requirements separately.
On this page
- Decide what job the space needs to do
- Measure the toilet and tank envelope first
- Compare the product opening, not only its outside dimensions
- Protect tank, service and cleaning access
- Check depth and room crowding
- Check shelf, cabinet-door and reach operation
- Verify installation and anchoring instructions
- Choose the storage method that matches the room
- Use the above-toilet fit worksheet before shopping
- Common above-toilet storage mistakes
- What to verify before buying
- Make the final decision
Decide what job the space needs to do
Do not start with the cabinet.
Start with the storage job.
Above-toilet space can hold very different kinds of things: reserve toilet paper, extra towels, daily toiletries, occasional supplies or items that simply have nowhere else to go. Those jobs do not require the same amount of space or the same level of access.
Write down what you actually want to store there. Then separate the list into three groups:
- items you need often;
- reserve or occasional items that can live higher or behind a door;
- items that could reasonably live somewhere else.
That last group matters.
An empty wall above a toilet is not automatically wasted space. If a storage unit makes the toilet harder to service, makes cleaning awkward or creates another daily obstacle, leaving part of the area open can be the better system.
If your real problem is that the whole bathroom lacks reserve storage, not specifically the wall above the toilet, see The Reasoned Home’s broader guide to bathroom storage without a linen closet. This article stays focused on whether the above-toilet location itself works.
Measure the toilet and tank envelope first
Before you measure a product, measure the fixture and wall it has to work around.
For the actual toilet and tank, record:
- the widest part of the toilet or tank that the storage must clear;
- the height of the tank top and anything that must remain accessible above it;
- the wall width available around the toilet;
- the wall-to-front projection where product depth could affect the room;
- baseboards, supply lines, shutoff valves or side obstructions that could interfere with legs or lower supports.
Do not replace these measurements with a generic “standard toilet” assumption.
The useful measurements are the ones in your bathroom.
A simple sketch helps. Draw the wall, the toilet and tank, then mark the widest points and any obstruction near the floor or sides. If you are considering a freestanding unit, pay particular attention to where its legs would land and whether a lower crossbar or support would pass behind or beside the toilet.
If you are considering wall-mounted storage, the floor-leg geometry may disappear, but the wall width, available height, projection and installation requirements still matter.
Compare the product opening, not only its outside dimensions
This is where many false fits happen.
A freestanding over-toilet unit has at least two different geometries:
- the outside body — its overall width, depth and height;
- the usable opening — the space between legs, rails, braces or lower cabinet structures that actually has to clear the toilet and tank.
The first does not prove the second.
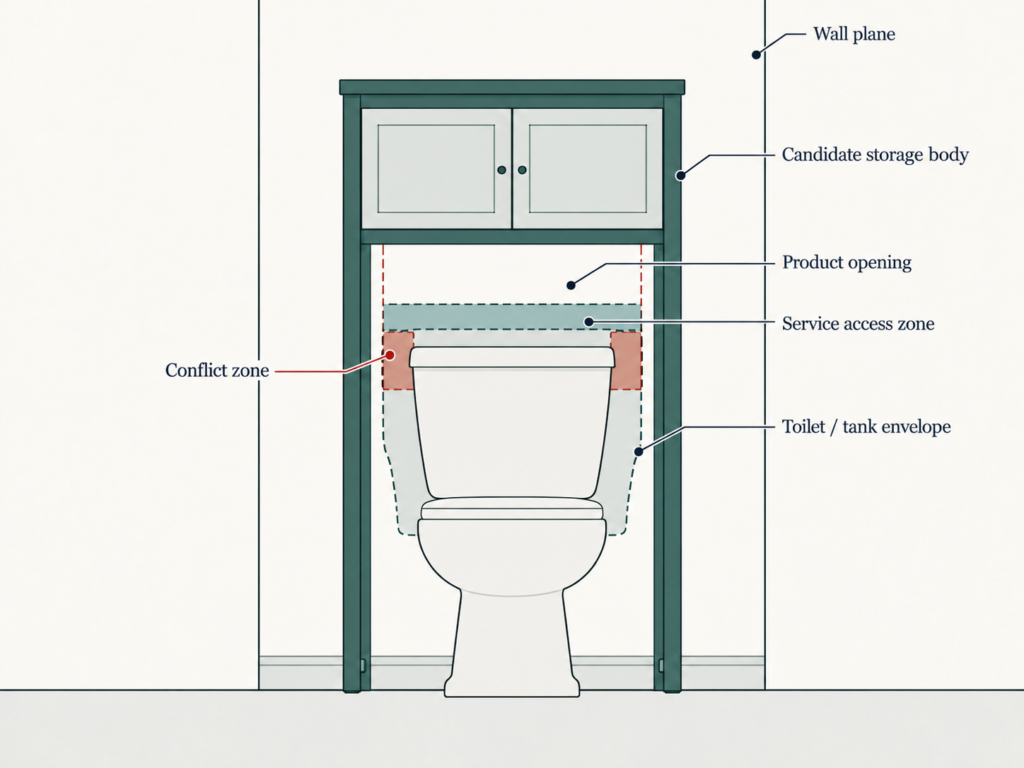
A unit can be 27 inches wide overall and still have a lower opening that is too narrow, too low or interrupted by a support in the wrong place.
Current products show why the separate measurements matter.
IKEA’s current FRÖSJÖN over-the-toilet shelf, product 605.749.05, lists an overall width of 25 5/8 inches, depth of 11 3/4 inches and height of 61 3/8 inches.
Those dimensions describe the product body. They do not tell you by themselves whether your toilet, tank, plumbing and wall arrangement fit inside the lower working area. You still have to compare the exact product geometry with the actual bathroom.
A current Home Depot listing for the Glacier Bay Shaker over-the-toilet model 5323WWHD lists the product at 26.7 inches wide, 10.1 inches deep and 68 inches high. The current filtered listing also exposes a separate “Toilet Clearance Height” field, shown as 35.5 inches for that model.
That is useful evidence because it separates overall product size from the geometry that has to clear the toilet.
It is not a universal 35.5-inch rule. It is a model-specific listed dimension.
If the exact product you are considering publishes an opening width, clearance height or detailed installation diagram, compare those values with your measurements. If it does not publish the dimension you need, keep the fit unresolved instead of guessing.
Protect tank, service and cleaning access
A unit can rest in place and still fail in normal use.
Before you call the fit acceptable, check whether you can still reach the areas you actually need.
Ask:
- Can you access the tank lid or relevant service area without dismantling the storage?
- Can you reach the supply or shutoff area if it matters in your setup?
- Can you clean around the toilet, wall and storage supports normally?
- Would one ordinary maintenance task require emptying shelves or moving the whole unit?
There is no single clearance number that answers these questions for every bathroom.
The test is whether the actual arrangement preserves the access your fixture and household need.
This is also why a very full-looking product photo can be misleading. The photo shows stored capacity. It may not show the tank lid being removed, the wall being cleaned, the floor behind a support leg being reached or a nearby fixture being used.
Treat access as part of the storage footprint.
Check depth and room crowding
Over-toilet storage uses vertical space, but it still projects into the room.
Depth matters.
The FRÖSJÖN example above is listed at 11 3/4 inches deep. The Glacier Bay Shaker example is listed at 10.1 inches deep.
Neither number is automatically good or bad. The question is what that depth does in your bathroom.
Stand where the product would project. Check whether it competes with:
- a nearby vanity;
- a door or door swing;
- a shower or tub edge;
- a towel bar;
- a narrow walking route;
- another fixture or storage zone.
A product can clear the toilet and still make the room feel harder to use because its upper body projects into a place where people turn, reach or pass.
Do not judge depth only from the floor footprint. A cabinet or shelf body can project at shoulder or head level even when the lower legs are visually light.
Use the product’s exact listed depth and compare it with the room at the height where the storage actually sits.
Check shelf, cabinet-door and reach operation
Next, test the storage after it is loaded.
A closed cabinet door needs room to open. A basket needs a retrieval path. An everyday item needs to be reachable by the people who use it.
Before buying, ask:
- Can cabinet doors open without hitting a wall, mirror, light, trim or adjacent feature?
- Can baskets or bins be lifted out without colliding with the ceiling or another shelf?
- Can the person who needs the item reach it comfortably in this household?
- Does the unit tempt you to put daily-use items in an awkward high position simply because shelf space exists?
- Will tall bottles or folded towels actually fit on the shelf you plan to use?
Do not substitute a universal reach-height rule for your household.
Use the real people, products and storage job.
This is one reason it helps to decide the job first. Reserve paper can tolerate a different access pattern from daily toiletries or frequently used towels.
The better system is the one that matches the item’s frequency and the room’s actual operation.
Verify installation and anchoring instructions
Do not assume that a freestanding-looking product can simply be placed behind a toilet and left there.
Read the instructions for the exact product.
For example, IKEA currently states that FRÖSJÖN 605.749.05 must be secured to the wall for safe installation. IKEA also states that different wall materials require different fixing devices and directs the buyer to use fixing devices suitable for the wall.
That is a FRÖSJÖN instruction.
It does not mean every over-toilet product uses the same hardware or has the same anchoring rule.
The correct habit is to verify the exact product’s installation requirements before you buy or install it.
Check:
- whether wall securing is required;
- whether hardware is included or must be selected separately;
- whether the product specifies wall-material requirements;
- whether the installation diagram shows lower rails, crossbars or braces that affect toilet clearance;
- whether any adjustable feet or leveling features matter on your floor.
If installation details are unclear, mark the candidate VERIFY INSTALLATION rather than assuming the missing information will work itself out later.
Choose the storage method that matches the room
Once you have the fixture measurements, product geometry and access checks, choose the method that creates the least conflict.
Keep the area open
This is a valid result.
If the toilet already has limited service access, the wall is awkward, the room is tight or the storage job is weak, leaving the area open may make the bathroom easier to maintain and use.
Not every empty wall needs to be filled.
Use freestanding over-toilet storage
A freestanding unit can be practical when the exact opening clears the toilet and tank, the legs avoid obstructions, the body depth works in the room and the installation requirements are satisfied.
Do not approve it from outside width alone.
Use wall-mounted storage
Wall-mounted shelves or a cabinet can remove floor legs from the problem, but they create different questions.
You still need to verify:
- wall width and height;
- body depth;
- shelf or door operation;
- the exact mounting instructions;
- whether the storage job belongs at that reach level.
Wall-mounted does not mean measurement-free.
Choose a smaller or shallower body
If the storage job belongs above the toilet but the first candidate crowds the room or fails the opening geometry, compare a genuinely smaller body.
Use exact dimensions. Do not rely on labels such as “space saver,” “slim” or “compact.”
Relocate the storage job
Sometimes the best answer is to store the category somewhere else.
If reserve towels force a deep cabinet into a tight room, or daily toiletries become inconvenient above the toilet, the storage job may belong at a vanity, wall cabinet, door zone or another room.
A calmer bathroom can come from giving this wall fewer jobs.
Use the above-toilet fit worksheet before shopping
Use this worksheet for each candidate.
| Candidate method / product | Storage job | Toilet / tank width | Tank / service notes | Wall width / usable vertical area | Product opening / toilet-clearance geometry | Product body W / D / H | Leg / crossbar / obstruction notes | Door / shelf / reach operation | Mounting / anchoring instructions | Decision |
|---|---|---|---|---|---|---|---|---|---|---|
| Your candidate | — | — | — | — | — | — | — | — | — | — |
Use a decision such as:
- KEEP OPEN
- USE FREESTANDING
- USE WALL-MOUNTED
- CHOOSE DIFFERENT BODY
- REJECT PRODUCT
- VERIFY INSTALLATION
Do not fill an unknown cell with an estimate just to finish the worksheet.
If the product does not publish the opening dimension you need, look for a manufacturer diagram or installation document. If the room measurement is uncertain because of a baseboard, valve, tank shape or nearby fixture, measure at the exact point where the product would sit.
The worksheet is not a universal pass/fail calculator. It keeps the unknowns visible so you do not accidentally turn them into assumptions.
Common above-toilet storage mistakes
Buying by outside width only
Outside width tells you whether the body might fit the wall.
It does not prove that the lower opening, legs or braces clear the toilet.
Record both.
Assuming “over-the-toilet” is a fit guarantee
It is a product category, not a promise that the unit fits every toilet.
Treat the label as a clue to intended use. Use the measurements and instructions as the fit evidence.
Ignoring a low crossbar or support
A product may have enough space higher up while a lower rail collides with the tank, plumbing or wall obstruction.
Inspect the full lower geometry.
Blocking tank or service access
Storage capacity is not useful if ordinary access requires unloading the unit.
Test access before you load shelves with reserve items.
Ignoring depth because the floor footprint looks small
Slim legs can make a unit look visually light.
The cabinet or shelf body can still project 10 or 12 inches into a tight room. Compare body depth at the actual storage height.
Ignoring the installation instructions
A unit that fits geometrically may still be the wrong candidate if the required mounting or anchoring cannot be completed correctly in that location.
Keep product-specific installation requirements attached to that product.
Filling the wall because it looks empty
Empty space can be useful for access, cleaning and visual breathing room.
Do not make the wall carry a storage job that the bathroom does not actually need.
What to verify before buying
When a candidate survives the room measurements, verify the exact current product.
Check:
- model number;
- outside width, depth and height;
- opening width or toilet-clearance dimensions when published;
- leg, lower rail and crossbar positions;
- cabinet-door, shelf or basket operation;
- wall-mounting or anchoring instructions;
- required wall-fixing conditions;
- whether the instruction diagram changes how you understood the product from the marketing photo.
Keep all product-specific rules attached to the exact product.
For example, FRÖSJÖN’s published dimensions and wall-securement instructions belong to FRÖSJÖN 605.749.05. The Glacier Bay dimensions and current 35.5-inch toilet-clearance-height listing belong to the current Shaker 5323WWHD example.
They are comparison evidence, not recommendations and not universal bathroom standards.
If an important dimension or installation condition is still unknown, do not convert the unknown into “probably fine.” Use VERIFY INSTALLATION or reject the candidate until you can confirm it.
Make the final decision
Above-toilet storage works best when the wall, fixture and product are treated as one system.
Measure the toilet and tank. Measure the wall. Compare the product opening separately from the outside body. Check depth, service access, cleaning, shelf or door operation and the exact installation instructions.
Then make one explicit decision.
KEEP OPEN when storage creates more friction than value.
USE FREESTANDING when the exact product clears the toilet, works in the room and can be installed as required.
USE WALL-MOUNTED when the wall geometry, product depth, storage job and installation instructions all work.
CHOOSE DIFFERENT BODY when the location makes sense but the candidate is too large, too deep or wrong at the opening.
REJECT PRODUCT when the geometry or operation fails.
VERIFY INSTALLATION when the product-specific requirement is still unresolved.
The goal is not to fill the empty wall. It is to add storage only when the bathroom remains easier to use afterward.